Lemon Droppers

Lemon Droppers

Essential oils are liquids distilled from shrubs, flowers, trees, roots, bushes, and seeds. They contain the true essence of the plant they were derived from, and are very powerful and concentrated. A little goes a LONG way, especially with the purity of YL oils.

My blog explains different uses for EO's (essential oils) and how Young Living can change your life as it has mine!

Thursday, January 5, 2017

Homemade Lip Balm

So, I decided to get creative for winter holiday gifts this year. Living in New England, everything dries us out from the biting, cold, outside air, to the dry air from the heat indoors. Waking up with cracked lips is a pain, and with all of the colds going around, it happens often. So, I hit the pantry (and ordered a few things) and made some AMAZING lip balm! Seriously, folks have been raving about it!


Ingredients

1/2 Cup organic coconut oil
2 Tablespoons organic shea butter
2 Oz beeswax (organic, cosmetic grade)
1 Teaspoon raw honey
1/8 Cup vitamin E (d-alpha tocopheral)
20-40 Drops of selected Young Living Essential Oils
(I used 5 drops of Frankincense, 5 drops of Lavender, and 10 drops of Peppermint)


Directions

Fill a medium sized pot about half way with water, and boil. Place coconut oil, shea butter, and beeswax in a glass container (mason jar, measuring cup etc) and place that in the middle of the pot of boiling water. We're making a double boiler!


Once the ingredients are good and melted, take the container off the heat, and place it on the counter. Now it's time to mix in the honey, vitamin E, and essential oils.


Now, you're ready to pour into your containers! I actually bought this really neat kit from Amazon where you can load up 50 tubes, and pour them all at once! It was super handy, though it took some figuring on amounts to ensure all of the tubes were filled. I had to remember to allow for some product loss around the edges and from the transfer out of the jar.


The kit even came with labels! This is my very witty design:


Thursday, March 17, 2016

HOMEMADE PEPPERMINT PATTIES

HOMEMADE PEPPERMINT PATTIES

Makes 12 patties

Ingredients 


  • 1/2 cup coconut oil  (refined will not have the coconut flavor. your choice)
  • 4 tablespoons raw honey 
  • 1/2 teaspoon vanilla extract  
  • 8-10 drops Young Living peppermint essential oil 
  • 1 cup chocolate chips, melted (semi-sweet or dark taste best)


Directions
  • With a stand mixer or hand mixer, beat the coconut oil, honey, and vanilla until very smooth.
  • Drip in the peppermint essential oil. Taste as you go to make sure you are satisfied with the level of mintiness.
  • Place this mixture in the freezer for 20 minutes to allow it to slightly harden
  • Once the mixture is firm enough to handle, divide the coconut oil mixture into 12 portions, and roll them into small balls.
  • Place the balls on a cookie sheet lined with parchment paper. Gently flatten them to form a disc.   


  • Place the cookie sheet back in the freezer for 20 minutes to allow them to firm up once more.
  • While the discs are chilling, melt the chocolate chips.
  • Remove the discs from the freezer and dip them into the melted chocolate. Place them back onto the parchment paper and allow to set.
  • Store your homemade peppermint patties in the fridge to prevent them from getting sticky and melting.


NingXia Red Sherbert

NingXia Red Sherbet

Ingredients:
  • 2 cups almond milk
  • 1 ¾ cups NingXia Red
  • ¾ cup Young Living Yacon Syrup (may also substitute with Blue Agave or 15 drops Stevia Extract)
  • 4 drops Tangerine essential oil (may substitute with other edible citrus essential oils)
  • 6 Life 5™ capsules (optional)
  • ¼ teaspoon vanilla extract
  • 1 cup fresh raspberries
  • ½ cup chopped Ningxia wolfberries (optional)


Directions:

  1. Mix together almond milk, NingXia Red, Yacon Syrup, Tangerine essential oil, and vanilla extract.
  2. If desired, open Life 5 capsules and add to the mix.
  3. Follow directions on your ice cream maker, adding ingredients as directed
  4. Add the fruit halfway through the freezing process, or when serving (this keeps the fruit from freezing solid)


Sunday, December 20, 2015

Holiday Gifts for Teachers

We had SO MUCH FUN making these awesome gifts for teachers!

All of the ingredients laid out
The final products! 

Teachers need a little pampering now and then!


Tuesday, June 23, 2015

The NEW Premium Starter Kit!

You guys... no, really... YOU GUYS!!!!!!!!! I am so, super, duper excited to share this information with you. Young Living has revamped the Premium Starter Kit, and added some amazing new features and options!

First off, they've added COPAIBA, RC & DIGIZE! These oils rock my world and I couldn't be more excited that they come with the starter kit now.

Secondly, can we talk about the packaging? I know. I'm a dork. Well, I usually call myself a geek, but whatever. The packaging is sooooooo professional and, dare I say, sexy? I LOVE that it comes with a little display stand for the oils! And drams for sharing! And sharing cards! and...

Looooooooooooooook! Watch this video and tell me you aren't JAZZED! *insert jazz hands*


Now, the coolest feature, I think, is that you can CHOOSE YOUR DIFFUSER! Yes, you heard me! At price points of $160, $170, and $260 for these kits, you're getting a STEAL!


Your Premium Starter Kit Includes:
  • Your choice in Diffuser
  • Premium Essential Oils Collection;
    • Lavender 5-ml
    • Peppermint 5-ml
    • Lemon 5-ml
    • Copaiba 5-ml
    • Frankincense 5-ml
    • Thieves® 5-ml
    • Purification® 5-ml
    • R.C.™ 5-ml
    • DiGize™ 5-ml
    • PanAway® 5-ml
  • Stress Away™ 5-ml
  • AromaGlide™ Roller Fitment
  • 10 Sample Packets
  • 10 Love It? Share It! Sample Business Cards
  • 10 Love It? Share It! Sample Oil Bottles
  • 2 NingXia Red® 2-oz. samples
  • Product Guide and Product Price List
  • Essential Oil Magazine
  • Essential EdgeMember Resources


Monday, June 15, 2015

Toilet Freshening Fizzies/Bombs

Having some friends over for taco night? Boom. Toilet Bombs! These are a simple, cost effective way to freshen your commode and impress company.


Ingredients

1 Cup baking soda
1/4 Cup citric acid
1/2 teaspoon vinegar
1 Tablespoon hydrogen peroxide
15 to 20 drops Young Living essential oils (purification, thieves, or lemon would work well)
Sheet pan
Parchment paper or non-stick foil
Measuring spoons
Spray bottle 

  1. Mix the dry ingredients together in a bowl, making sure to break up clumps
  2. In a small glass or bowl, mix the wet ingredients
  3. SLOWLY drop the wet ingredients into the dry ingredients. If you drop it all in at once, there will be a mess!
  4. Add in your essential oil and gently mix. 
  5. Using a 1/2 teaspoon, scoop and mold the mixture into small half-rounds and tap onto a parchment/non-stick foil covered sheet pan. Immediately  spritz the fizzies with equal parts vinegar & water to create a crust. You want to do this every 10 or so as they will start expanding quickly.
  6. Let dry at least four hours. Overnight is preferred.
  7. Place in a cute, air tight container in the bathroom with some instructions! (Flush toilet, drop in fizzie, leave with a smile!) or, if you're not that classy, (Drop your bomb, flush, then drop one of these)


Reusable Dryer Sheets

Reusable Dryer Sheets


Ingredients

• 1/2 C white vinegar
• 4 drops of Young Living essential oils (I use purification & lavender)
• Reusable Container
• Cotton cloths (wash clothes work well) 


Mix vinegar and oil in small bowl. Pour over the cloths until dampened, not soaked. Keep in a closed container, preferably glass. 

To use, squeeze cloth for excess liquid to go back into container.
Toss into dryer. When clothes are dry, place the dryer sheets back into the container for later use. Refill liquid as needed.


Go shampoo-free with ease!

Most commonly known as the "no-poo method," I prefer to call it "shampoo-free." It just has a better ring to it. :-) Using this form of hair care, you cut out the normal use of commercial shampoos and conditioners. It's cost effective, simple to make, and I've had great success using it.

If you do a google search, you'll find several different recipes and regiments. I will be sharing mine below. Bear in mind that we are all made differently, with different pH balances, and hair types, and that this is not a one-size-fits-all situation. You may need to tweak how much of each ingredient you use.

Some people also find that their hair and scalps go through an adjustment period of a few weeks. I did not come across that, but bear in mind it may happen.


Hair Wash

2 Cups hot water
2 Tablespoons baking soda
2 Drops Young Living Thieves essential oil blend

Mix the water and baking soda together in a measuring cup or bowl until the water goes from cloudy to clear. Pour the mixture into the container you will be using in the shower (I use an empty dish soap bottle). Once the mixture is in the container, add your thieves oil. Cover & shake.

Conditioning Spray

2 Cups water
2 Tablespoons apple cider vinegar
2 Drops Young Living lavender essential oil

Mix the water and ACV together in a mixing cup or bowl. Pour into a spray bottle. Add the lavender essential oil. Cover and shake. 


Usage

  • In the shower, wet your hair thoroughly 
  • Take the wash and pour some on your hair. You want to start at the skull, and squeeze just enough to cover your hair. 
  • Scrunch and massage as you would with shampoo. 
  • Rinse right away. 
  • You may notice that your hair feels a bit dry at this point. Don’t worry, it will be softer after the next steps.
  • Right after you rinse out the wash, you want to spray your hair with the conditioner. Make sure you get really good coverage from root to end, and massage it in well. 
  • Leave it in your hair for the remainder of your shower. The last thing you want to do before exiting, is rinse it out of your hair.
  • Towel dry your hair, then apply 1-2 drops of lavender by dropping into your hand, then massaging into your hair. If you can, allow your hair to air dry.
  • Once your scalp has adjusted to this new regiment, you should only need to do this once or twice a week. The rest of the time, just wash with water and apply lavender after.

My hair has never looked or felt better!


Wednesday, June 10, 2015

Homemade Playdough with EO's! Sensory awesomeness!

I may spend a bit too much time on Pinterest. LOL That being said, I decided to make play dough as favors for my daughter's rainbow unicorn themed birthday party. I didn't want to hand out little plastic toys that are easily lost or broken, or a bunch of candy. I was looking up ideas for rainbow themed favors, and most of them were either those, or more expensive items like paints and such.

Then, I saw this and I got very excited! YES! This is perfect!

So then I got to work researching playdough recipes. I stumbled across SO many different recipes and preparation methods. The first recipe I tried was WAY too sticky and didn't work. After some experimentation and tweaking, I came up with the BEST recipe!

Ingredients:

1/2 Cup salt
1/4 Cup citric acid (some recipes call for cream of tartar. I found citric acid makes a firmer, less sticky dough)
2 Cups unpacked, all purpose flour
2 Cups hot water
2 Tablespoons vegetable oil (do NOT use coconut oil. bad mistake on my part!)

Optional:
Food color of your choosing
Using flavored teas instead of water for added color & scent
Add in 10-15 drops of essential oils for scent and added sensory experience
  1. Place a large non-stick skillet on medium heat and let warm up while preparing your dough.
  2. Mix dry ingredients in a bowl (you will be mixing the color in the bowl later, so make sure to choose one that won't stain)
  3. Put two cups HOT water from the tap (or tea)  in a measuring cup or bowl
  4. Add the oil, and food coloring, to the water and mix well
  5. Pour the wet ingredients into the dry ingredients and mix well
  6. Making sure the pan is heated, pour the mixture into the pan. Stir slowly, continuously, until it is no longer a liquid and becomes a pretty solid dough 
  7. Turn the dough onto a dinner plate or platter and let it sit to cool
  8. Once the dough is cool, you will want to knead it for a few minutes to make sure there aren't any dry ingredients left unmixed, and to make the color and consistency more uniform. If you are using essential oils, add them to the dough and THEN knead it.
Each batch yielded approximately 2.5-3 pounds of dough. You are seeing 4oz plastic containers below. Each dough ball is between 3-4oz below, and the recipe will yield approx. 15. 


As I am making this for favors, I've obviously made a whole bunch. LOL My husband said our fridge looks like a science experiment. I put them in the fridge to store just to make sure they're totally fresh for her party. 

You want to make sure you store your dough in an air tight container like a freezer bag, or Tupperware, for example.

Mistakes I made that you should avoid:
  1. Do NOT use coconut oil. You want to use vegetable oil.
  2. Do NOT try to skip the cooking part and just use boiled water
  3. Do NOT add the coloring to the dough after it's been cooked. DO add it to the water and then cook.


Thursday, February 26, 2015

Can't wait for Liberty Forum!

Made this super cute give-away for the Liberty Forum! I'm so excited about this event. It's going to be a great place to meet new people and discuss my passion for oils. Are you going? Make sure to stop by and visit!


Wednesday, December 10, 2014

Starter Kit Gift Idea #7 Scented Stationary

In today's world of constant electronic communication, receiving a hand-written note in the mail is a heart-warming moment for most of us. And, it's a great way to stay in touch with folks who don't use computers or smart phones. 

Personalized stationary can run expensive, especially if you're going to The Paper Store or Hallmark. A small set of personalized, scented stationary is the perfect gift for someone you'd love to stay in touch with.

A nice pen or return address labels would be a great additions to this gift as well. 

Materials

10 sheets of stationery, note cards, paper, and/or envelopes of your choosing
1 large, resealable freezer bag
1 small cotton pad like an aroma diffuser replacement pad or a cotton round used for facial cleansing
10-15 drops Young Living essential oil of your choosing

Directions

Place your paper inside the resealable freezer bag
Drop the essential oils onto the cotton pad
Place the pad between the sheets of paper inside the bag.
Seal the bag and allow it to sit for 1-2 days to permeate the paper

**To scent many sheets of paper at one time, stack the paper in a pretty box and place an oiled facial tissue or cotton pad every 5-7 sheets. Tie or tape the box shut**

You can also do this yourself with birthdays, valentines day (orange wink wink), holiday cards etc

Grammy loves getting your letters!

Starter Kit Gift Idea #6 Healing Lip Balm

'tis the season where the heat goes on, and the air goes dry. The cold wind hits your face as you're cleaning the snow off the roof of your car or as you ski down the bunny hill. Your lips chap and you fall into the endless cycle of slathering on lip balm, only to have your lips feel dry again a short while later. Why? Because a good majority of lip products on the market include things that provide temporary relief, but in an hour or two you find your skin even drier. They create a barrier that sits on top of your lips and locks out any moisture they may be getting from the air.

So what's the solution? This homemade lip balm that help SEAL IN moisture, actually SINKS INTO your lips, and WON'T create a moisture barrier that ends up drying them out.

Ingredients

1 Tbsp grated beeswax, OR beeswax pellets (make sure you are working with small sizes for faster melting)
1 Tbsp virgin organic coconut oil
1/4 tsp organic raw honey
2 Vitamin E capsules
5-10 drops Young Living essential oils (recommend lavender, lemon, citrus fresh or frankincense)

Directions

In the double boiler, melt down the beeswax, adding in the coconut oil when about half of the beeswax is melted. After it's all melted and blended together, break open the vitamin e capsules and pour the contents in and mix together. 

Remove from heat and let the mixture cool down a little bit, but not all the way. Now add in the raw honey and essential oils & slowly mix in. Pour into your containers and let harden. Makes around 4 tubes.


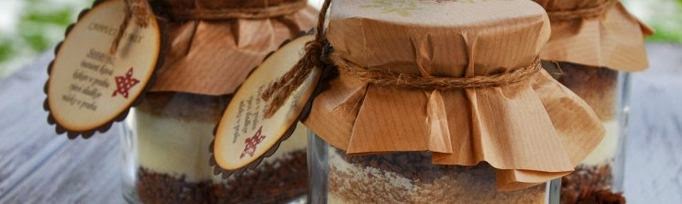
Starter Kit Gift Idea #5 Peppermint Hot Cocoa Mix

Close your eyes, take a deep breathe, and imagine yourself sitting by a fire with your hands wrapped around a hot cup of peppermint cocoa. Hear the crackle of the fire and the soft murmurs of family members nearby. Slowly take a sip and feel the warmth tingle down to your belly.

Now, wouldn't you love to share that moment of bliss with someone? Make some jars of mix for them and they can enjoy the same!

Ingredients

1 cup unsweetened cocoa powder
1 cup organic whole sugar
1/2 tsp sea salt
1/2 cup mini chocolate chips
6 drops Young Living Peppermint essential oil
2 pint-sized mason jars w/lids

Directions

In each mason jar, layer ingredients in this order:
  1. cocoa powder
  2. sugar
  3. salt
  4. chocolate chips
  5. peppermint

Put the lips on the jars & decorate as you like. Make sure to add the following directions:

Mix contents in a bowl. For each serving, place 1/3 cup mix into a mug & stir in 1 cup of hot milk (can use any kind of milk). Store remaining mix in mason jar. Makes 12 servings.


Not recommended for use on children under the age of 6, or pregnant or nursing women.


Starter Kit Gift Idea #4 Bath Salts

What better gift is there to give someone than that of relaxation during the holidays? 

These bath salts are great for relaxing. You can use almost any of your kit oils to make them, too! Same recipe for all. 

Hanukkah Duck wants to relax with your oils

You can also get really creative on presentation! Put them in Christmas ornaments, mason jars, burlap satchels, beakers, etc. The possibilities are really endless!

Ingredients

Plain, unscented Epsom salts
Young Living essential oils

I didn't give measurements because they will vary depending on your container. 

Fill your container half way with Epsom salts. Add 2-3 drops of essential oil, cover, then shake. Fill the container up the rest of the way, add another few drops, then cover & shake again. Add some decorative ribbons, bows, labels etc.


Suggested Single Batch
  • Frankincense 
  • Peace & Calming 
  • Peppermint 
  • Valor 
  • Lavender 
  • Stress Away

Suggested Mixes 
  • Peppermint & Lemon
  • Lavender & Purification
  • Thieves & Citrus Fresh
  • Frankincense & Lavender
  • Mel A & Stress Away


Not sure use with babies or young children. Peppermint should not be used by pregnant or nursing women.

Starter Kit Gift Idea #3 Lemon Hand Degreaser

Just got in from working on your car or fixing up your bike?  
Greasy hands are no fun, and can be very difficult to get clean. When regular soap & water aren't cutting it, it's time to bring out the big guns and go for the LEMON!

Hand Degreaser


Ingredients
2 Tbsp olive oil
2 Tbsp epsom salt
4-6 drops Young Living Lemon essential oil


Instructions
Mix all ingredients in a 2oz GLASS bottle. Do not use plastic as the lemon oil will eat through it. 


Use
Shake bottle to mix ingredients. Dump a little into your hands and rub together. Rinse well with warm water.


About Lemon

Lemon (citrus limon) has a strong, uplifting, citrus scent and is a powerful antioxidant. 

Keep out of reach of children. Avoid using on infants or very small chldren. Avoid using on skin exposed to direct sunlight or UV rays immediately after use. Do not use nrea fire, flame, heat or sparks.


Monday, November 24, 2014

Starter Kit Gift Idea #2 After Shave w/Melaleuca Alternifolia & Stress Away

This is a great follow-up to the Day 1 gift of shaving soap! Combine it for one gift, or give this one separately for people who use different shaving methods. This works well for men & women!

Day 2 of my Starter Kit Gift Ideas is for After Shave using Mel A & Stress Away! I am going to be posting both a salve & a liquid.

These can also be applied after waxing


Aftershave Salve 

1/8 cup organic coconut oil
1/4 cup organic raw shea butter
2 drops YL Melaleuca Alternifolia (tea tree) essential oil
2 drop  YL Stress Away essential oil blend

Add everything into a small bowl and whip with a small blender, stand mixer, or by hand. Place into a nice container and you're good to go! 

This is a rich, creamy salve that goes on smoothly and really moisturized nicely. Can be used on the face and body! A little bit goes a long way.

Liquid Aftershave

3 Tbsp witch hazel
5 Tbsp organic apple cider vinegar
2 drops YL Melaleuca Alternifolia (tea tree) essential oil
1 drop YL Stress Away essential oil blens

Combine all ingredients in a jar with a well-sealed lid. Close and shake the jar to mix thoroughly. Place the jar in a cool, dark place for a few days, making sure to shake it well once a day. It should be ready to go after 3-4 days. Shake well before use.

There are different options for use as well
  • Place in a spritzer bottle and lightly spritz onto your skin after shaving. Make sure to avoid sensitive areas like lips & eyes.
  • Poke small holes in the lid of your jar. Using a cotton ball, shake a small amount out and then use the cotton ball to pat your skin
  • Pour a small amount in your hands. Lightly pat your hands together, then apply to face.


Friday, November 21, 2014

Starter Kit Gift Idea #1 Frankincense Shaving Soap

Many of us LOVE home made gifts! And yes, that includes our facial shaving population. :-)

Day 1 of my Starter Kit Gift Ideas is for Frankincense Shaving Soap.

Ingredients

2 bars castile soap (Dr. Bronner's is a popular brand)
1 Tbsp carrier oil (you can use coconut, olive, avocado, almond)
4 Tbsp french white clay
5-10 drops of Young Living Frankincense Essential Oil

You will also want to choose what type of container you are putting the shaving soap in. For a complete gift set, you can by a shave brush & container. Sometimes they even come with a razor and other accessories.


Otherwise, you can put the soap in a mason jar, mug, bowl etc.

Instructions

  1. Grate the bars of soap using a cheese grater or mandolin
  2. Place the grated soap in a medium sized pot on low heat. Add in the oil of your choosing and let them melt together. This could take a minimum of 15 minutes to start seeing results. Some bars may take even longer. 
  3. Once the soap and carrier oil are melted smoothly and combined, add in the clay and mix well. 
  4. Remove the mixture from heat and add in the frankincense oil. Stir gently but well.
  5. Pour into the containers you chose. You can also pour the remaining liquid into silicone muffin or shape trays for refillers.
  6. Let the uncovered containers sit out for 5-7 days to harden and cure. They will harden more over time, and the shaving cream lasts for several uses.

How to use a shaving soap & brush

  • The methods are somewhat personal to each user. Foaming a shaving soap is a bit like mixing concrete; use too much water and it's soup, not enough water and, well, you get the picture. That being said, this is a good place to start. 
  • Soak the bristles of your brush in hot water for about 15 seconds. Remove it from the water and squeeze off the excess water OR shake it a few times. 
  • Swirl your brush briskly around the top of the shaving soap, rubbing the soap into the brush. When a lather starts to form, continue rubbing for another 30 seconds or so to make sure the brush has picked up enough soap.
  • Rub the lathered-up brush on your face, brushing vigorously to coat with the soap. The lather will start to build up on your face. You should have more soap than hair showing. You may want to add a few drops of water onto the brush and continue to lather your face.
  • Once you reach the desired lather, you can rinse and squeeze your brush then get to shaving!

About Frankincense 

This is directly from Young Living:

"Frankincense (Boswellia carteri) has a sweet, warm, balsamic aroma that is stimulating and elevating to the mind. Useful for visualizing, improving one's spiritual connection, and centering, it has comforting properties that help focus the mind and overcome stress and despair. Frankincense is considered the holy anointing oil in the Middle East, where it has been used in religious ceremonies for thousands of years. 
More recently, it has been used in European and American hospitals and is the subject of substantial research. 
Frankincense is also a valuable ingredient in skin care products for aging and dry skin. The ancient Egyptians used it in rejuvenation face masks. Frankincense has an approximate ORAC of 6,125 (TE/L). TE/L is expressed as micromole Trolox equivalent per liter."


Sunday, November 2, 2014

Homemade crockpot applesauce with thieves & lemon

So simple, so healthy, so inexpensive, SO TASTY!! Apples are for sure a fall favorite. But applesauce is delicious and loved by most year round. My daughter LOVES applesauce and this is a no fuss, easy, and cost-effective way to make super yummy and healthy applesauce. I KNOW what's in it, and I know it's amazing!

Ingredients

8 Medium-Large apples of your choosing
1 1/4 cup hot water
3 Tablespoons raw honey (regular is OK if that's all you have)
1/8 teaspoon vanilla extract
2 drops Young Living lemon essential oil
1 drop Young Living thieves essential oil

Step 1

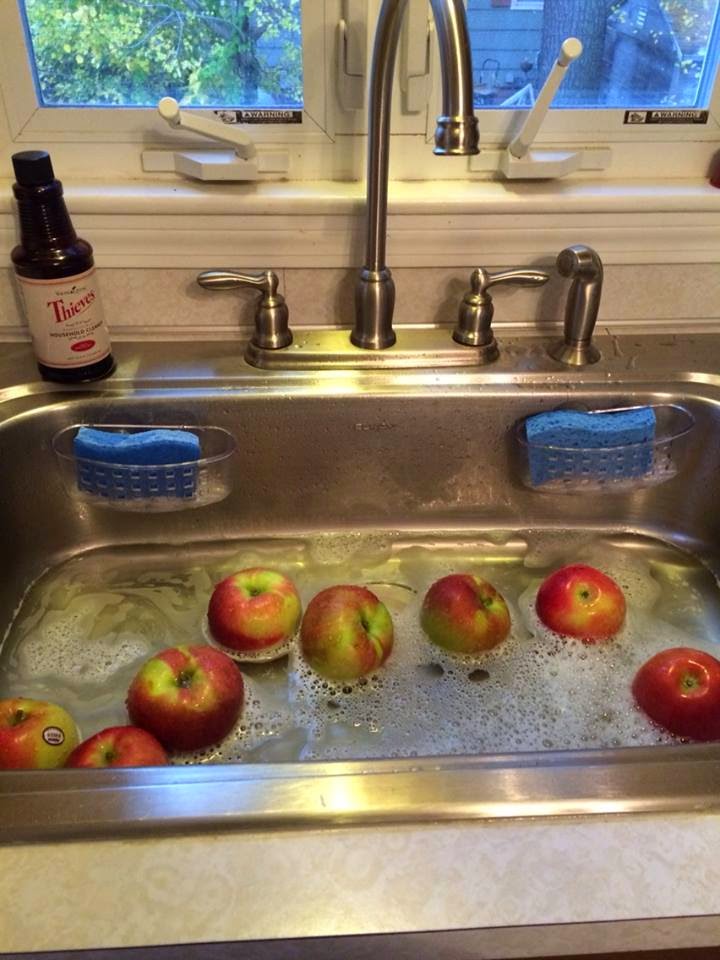
Wash your apples! I fill my sink with water and a splash of the thieves household cleaner, then swoosh the apples around. Rinse with water.


Step 2

Core, peel, and slice the apples. I prefer a little bit of peel in my applesauce. You can leave the peels on, or totally peel them. Have it your way!


Step 3

Put your apples in the crock pot. You'll want it nice and full! 


Step 4

Whisk together the hot water, vanilla, and honey until well blended. Pour the mixture over the apples, making sure to pour evenly over the top.


Step 5:

Set the crock pot on high and cook for 3 hours. Stir once an hour, making sure to mix well
Turn it down to low and cook for an additional hour 
Set aside 
At this point, add in your essential oils and stir 
Let the applesauce sit until lukewarm


Step 6

This step is really up to preference. You can leave the applesauce as is if you prefer it to be chunky. Other options include mashing with a potato masher, blending with an immersion blender, or pouring the applesauce into a food processor. Personally, I just use a potato masher and mash it up a bit. We like it a little chunky. Transfer into a container and store in the fridge. Enjoy!